Followers

29 Jul 2013

Prima Doll Challenge

A big Welcome to Becky who is our guest designer for July.
Iain and I met Becky and her husband Keith a few years ago at a craft show, they are such a lovely couple, who we always look forward to seeing.

Pop over to her blog and give her a big welcome, hope to see lots more of her work in the future
http://becky-bailey-blog.blogspot.co.uk/


Hi all I am Becky and I like to say thank you to all at Ali-Craft for asking me to be a guest designer.I have never done this so hope I do it right.
I am afraid I didn't take pictures as I went along so will remember that next time.

This is the stamp I used.


Here is my card 


I started with a kraft card as the base. I then cut some black card slightly smaller than the base card and then a smaller piece of kraft card. I stamped the Prima Doll on right hand side then stamped Tim Holtz ruler down left hand side using Archival Ink and some others of Tim's stamps randomly on card with walnut stain ink. Gave the stamped doll a bit of colour using Promarkers I also added a few measurements to image I then edged all around with walnut stain distress ink. Then using a mannequin from Craftwork Cards stamp a text on it and coloured with walnut stain. I then stamped  doll again on one of the tags I was sent with stamp. I then cut out the skirt and also cut of the lace around the hem I coloured the skirt with Promarkers  I then put some proper lace along the bottom and around the waist attached it to the card on right hand side added a flower to the top of mannequin.I then stamped the word inspire on a piece of the tag put it into a metal frame and attach to bottom left hand corner.I have enjoyed doing the challenge and the stamp stamps beautifully every time.

I hope I haven't confused you and look forward to the next challenge I do.

         Thank you
                  Becky  x

28 Jul 2013

Graphic45 Secret Garden Card by Avril

Secret Garden Card by Avril

Avril was our 1st blog challenge winner, and won a 12x12 and a 8x8 Graphic45 Secret Garden paper pad, and has made this wonderful card 
pop over to see details on her blog


21 Jul 2013

Prima Dolls

Please give a big Welcome to Angela, our new design team member.
Angela has been crafting for many year, but is new to blogging, so please pop over and follow her in blog land x 


Hi Blogging Friends this is Angela from Felix the Crafty Cat, pleased to be here.
For the next few weeks the Design Team Project will be Prima Dolls.
This is my first entry as a Design Team Member for Ali-Craft so I hope you will be gentle with me lol!

I have been really impressed with these stamps, they give a very clear impression and are fun to use.
Though great images in their own right , they are begging to be altered. So here goes!

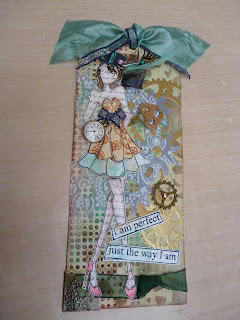
This is my completed tag and this is the stamp I received.


Ali also sent us some of the Prima Tags. 
I started the design by adding a crackle effect to part of one of these tags.


I then used a Sizzix embossing folder to give more texture


and added colour with Worn Lipstick Distress Ink and Big and Juicy Waterfall ink pad. I do so love layers!


I stamped the doll on white text card, her dress, several times onto some new Steampunk Spells by Graphic 45 and on some hand sprayed paper.
 

Next, I layered the sections of the dress to create a 3D effect.


I then turned the dress over and using an embossing tool, shaped the bodice.

Everyone knows that a fashionable Steampunk follower needs a top hat and I used a Judikins stamp to create this.


I stamped this on paper I had sprayed with Cosmic Shimmer.


More detail added with a Prima Mask.


Sorry I did tell you I liked layers! and this time I used parchment, folded and placed onto the Tim Holtz Gadget Gears so that some parts of the folds are not cut which gives a circle of joined gears.


I placed this between a Tim Holtz embossing folder.


I used some die cut keys from Maya Road and distressed these with Tim Holtz Distress Embossing Powders.


And here is the finished design.
I used Aquamarkers for the shading on her body, legs and arms.
The sentiment is a Dylusions Stamp.
There are Spellbinders die cut gears and the ribbon, clock, metal gear and corner completed the tag.

I hope you have enjoyed my first posting and I look forward to coming back with more offerings.
Angela x

19 Jul 2013

NEW RANGE FROM GRAPHIC45 NOW AVAILABLE TO PRE-ORDER AT A SPECIAL 10% DISCOUNT RATE (discount shown and will finish one week before they are shipped)

PRE-ORDER ON WEBSITE   www.ali-craft.co.uk 


14 Jul 2013

On the Boardwalk


Boardwalk - Artisitc Outpost 
I hope you've been enjoying the hot weather here in the UK.  Summer has finally arrived - lets hope it stays with us for a while this year. 

For my card and tutorial this week I've used the "Boardwalk" stamp set by Artistic Outpost.  They make some fabulous vintage themed collections full of interesting and quirky detail, and are for sale over in the Ali Craft shop

I know this years 4th July has come and gone but to celebrate I've make a patriotic themed card in traditional red white and blue muted colours to give it a vintage feel.  

Boardwalk Card Supply List 

Supply List 
Stamp Set:  Artistic Outpost Boardwalk
Adirondak Inks - Red pepper, Latte, Lake Mist
Archival Ink- Coffee  
Distress Ink pad - Stormy Sky 
Distress ink Pen - Walnut Stain 
Red May Arts Cord 
Foam Dots/Tacky Glue 

To Make: 
Take a piece of Kraft Card and cut a 7" piece (lengthways).  Fold in half and score the fold with a bone tool. 
Then cut three mattes from smooth white card in the following sizes:  6 1/2" x 4 1/2", 6" x 4 1/4" and 5 3/4" x 4". 
Using your ink brush, and craft mat put some red pepper ink on your craft mat, work your brush into the ink to pick up an even coverage and then colour the edges of your largest white matte
then repeat with the middle sized matte with stormy sky ink and finally colour your smaller matte with a mixture of latte ink, stormy sky and lake mist ink for a lighter finish. 
Layer your three inked mattes together and stick to your card leaving a 3/4" border at the bottom for detail to be added later. 

Now stamp out the images shown below with coffee Adirondak ink, then shade the post mark and lady using red pepper and stormy sky ink.(Stamp out three buildings and cut the middle section out of one to give you three pieces to work with). 


Working on the tickets colour two red and two blue, and then cut them into bunting


Take your stamped buildings and crease the two full images along the corner line for a 3d effect.  Then position and stick the centre section under the two larger images trying to line up the promenade. Put foam dots/tape on the under side to the right of each crease and stick to your card with a little tacky glue. 


Take the lady, put foam dots/tape on the back and stick to your card over the centre section of the buildings.

Attach the red twine with tacky glue and then add the bunting over the twine, postage marks and a few shells to your card. 


Add a shell and two more tickets (scrumple them first) to the bottom left of your card. put foam tape on the back of the boardwalk banner and stick in place to the bottom right of your card.  


To finish your card stamp out the sand between her toes wording, cut out, scruple and stick to the bottom left of your card with a couple more shells. 


 I hope you've enjoyed the tutorial and have fun if you make one yourself. Hhave a great week :-) Clare

10 Jul 2013

Ali-Craft Workshops Sneek Peek


                      ALI-CRAFT WORKSHOP       

          Join Ali + Iain for a great day of crafting

                    Altered Art Project £40


             Saturday 3rd August 10am - 4pm (Mansfield)

       Saturday 26th October 10am - 4pm (Chirk, Wrexham)

Full day workshops with all materials, refreshments and lunch included. 


 3rd August                                              

The workshop is being held at 

MDF BLANKS STUDIO
Unit GB, Mill 3,Pleasley Vale Business Park
Mansfield,  NG19 8RL 


26th October at 

The Craft Bug 
23 West View 
ChirkWrexham LL14 5HL


                                                          Start with a large draw box


Alter with Paints, Inks, Stamp and a lot more ...........


Bookings now being taken.  
Either book on website with a £10 deposit, or phone or email Ali x
www.ali-craft.co.uk    07860186695


8 Jul 2013

Doo Lally Pip Creation by DT member Barbara


I've been playing again................

With the delightful Doo Lally Pip stamps by Lindsay mason.

For this months Ali-Craft design Team creation, I have chosen to use this stamp set, it is called Time Travel.

Ali-Craft have a large selection of the fabby Doo Lally Pip Stamps available from the website (just click on highlighted ali-craft link above)

Christmas Doo Lally stamps will be available this week on the website, and at Summer Crafting show at Doncaster


Time Travel


Here is my completed card for you.


Love the glossy Accents.


Now if you would like to recreate this card, here is a list of what I used.


Doo Lally Pip Clear stamps "Time Travel"
Cream Card
Brown Card
Kraft Card 
Distress Paints in  the following colours Antique Linen, Walnut Stain and Broken China.
Archival Ink in Coffee
Prima 6 x 6 "Engraver" paper Pad
Glossy Accents
Prisma Pencils and Gamsol  (Odourless Mineral Spirits)

Take your cream card and trim it to 4.5 x 5.5 inches.

With the Antique Linen Distress Paint, give the card a generous coat and let it dry, you can give it a blast with a heat gun to speed the process up. once this has dried grab your broken china distress paint, and gently swipe the paint top over your card, ensuring not to press too hard as  we are looking for a random look! if you find you have put too much on, don't panic, grab a wet wipe and clean the paint off and try again.
Now the final colour the Walnut Stain, yes I know it is dark colour but with a gentle swipe it is not so in your face IYKWIM, I gave a couple of swipes on the main body of my card, then I went for the corners, if you notice my corners are more smoother looking. How did I achieve that I hear you ask. All I did, was to rub the paint into the surface after I had applied it, this smoothed out those drag marks and blended it in more.

For the image, I stamped it onto Kraft coloured card and a second image onto a piece of patterned paper from the Prima Engraver pad. I then coloured his Hair, Hat and Trousers using my Pencils and Gamsol, then I fussy cut him out and his Coat from the patterned paper.

On your painted piece of card stock, I stamped the Watch image using Archival ink in coffee. Randomly all over, then heat set it to dry the ink.

Stamp the verse onto scrap Kraft card in the coffee ink and cut out each word.

Now time to assemble.

Adhere your main image onto your Painted and Stamped card front, then adhere his coat as well, place the cut out words where you would like them to be stuck, when you are happy with the placement, stick them down, I used glossy accents, as this gives a bit of wiggling room!
As a final touch I stamped the screw heads along the bottom and covered them in Glossy Accents, I also added a bit to his glasses and watch on top of his hat. this is then ready to mount onto a card blank.


I hope you like this card, if you have any questions, please feel free to contact me.

Happy Crafting


Barbara

5 Jul 2013

Ali-Craft Monthly Blog Challenge # 2 - 'Butterflies'


Good morning, welcome to our second challenge. Thank you to all of you that entered our very first challenge last month. We had a fantastic response and some wonderfully creative projects were shared.
Our winner who will be sent the wonderful prize of two Graphic 45 paper pads is :

Well done you lucky lady, please contact Ali and she will send you your prize.


Now to our challenge for July.  Our theme is 'Butterflies', we have shared a lovely photo of some glorious images of butterflies, we do hope this inspires you. You can enter your creations below via the link. You may use any image, all that we ask is that a butterfly is visable somewhere on your work.  Please see the challenge rules below on how to enter.

We are offering another great prize, this month is :
A £15.00 on-line voucher to be spent on the Ali-Craft Website.

Firstly, before we get to DT's creations, we would like to thank everyone for applying for the DT post, we had so many wonderful entries, but can only take two. After a lot of consideration we have managed to pick two and a guest designer, so would like to officially welcome Jane Millard and Angela Radford to our Design Team. We also welcome our Guest Design Team Member - Becky
Please do check out their fantastic blogs, click on their names to see more.

Here are the Design Team makes for July/August :-

Barbara using Doo Lally Pip stamps 8th July
Clare using Artistic Outpost stamps 15th July

From the 22nd July to 26th August :

The DT will all be bringing you some fantastic designs using the Prima Doll stamps. Each designer will be using a different doll, so can't wait to see what they come up with.

We are doing a Prima doll stamp multi-buy special on our website during this time
Stamps are available from our website
The Ali-Craft Design Team Challenge Makes

Ali's card 
I also used this for a white on white challenge


Andrea's Card
Using the Kaisercraft Perfume Clear stamp


Angela's using Kaisercraft Vintage stamps

Barbara's card

pop over to her blog for project details (via side bar)


Becky - Our Guest Designer 
 
Card - Stamps were IndigoBlu and Ecogreen inks.

Dusty Concorde and Seedless Preserve and a tcw stencil.


  Tag - Tim Holtz stamps inks - Adirondack sunset Yellow, Sunset Orange, Red Pepper and Raisin.


Clare's card
From the Artistic Outpost stamps


Heidi's Tag using
Kaisercraft 'Botanical' & 'Life Sentiments' stamps
Bo Bunny 'Isabella' Paper & 'Tim Holtz' 'Milled Lavender' & Victorian 'Velvet Ink' pads


Jane's card 
Using the lovely Artistic Outpost stamps set
Happiness

Blog entry by Jean
(if you don't have a blog, just email me your entry, and i will add it for you)

2 Cards by Petronella  


Card by Stacy


Here are some rules we would like you to adhere to, when entering our challenges.
Ali-Craft Blog Challenge Rules

(1) You can use any images to enter our challenge.

(2) Please also leave a comment on the blog post.
(3) You may enter the challenge UP TO 3 TIMES ONLY PLEASE and you may combine with other challenges.


(4) You MUST follow the challenge theme and NO BACKLINKING please, new cards only.


(5) Please provide a link to our blog in your post.


(6) Please leave a link (via link below) to your actual card, not just to your blog.
(7) Please turn off Word Verification on your blogs, it makes it so much easier & quicker to leave a comment on your blogs.
(8) The challenge finishes on Saturday 3rd August 2013 @ 4pm and the new challenge, will start on Saturday, 10th August 2013.

We are looking forward to visiting your blogs to see all of your lovely projects.  Please do leave us a comment.